MY CART
MY ACCOUNT
Maintaining the brakes on your electric scooter is essential not just for performance, but for your personal safety. Whether you're commuting daily or riding recreationally, knowing when and how to change electric scooter brakes is a vital skill. In this comprehensive guide, we’ll walk you through everything you need to know; when it’s time to change your brakes, what parts you need, and a step-by-step scooter brake tutorial covering hydraulic disc brakes, cable disc brakes, and drum brakes. We'll also touch on brake maintenance and post-repair safety checks to ensure you're riding safely every time you hit the road.
Let’s begin by understanding how to identify when it's time to change electric scooter brakes. While every model may vary slightly, the general signs are universal: reduced braking power, squeaking or grinding noises, spongy brake levers, and an increase in stopping distance. For disc brakes (both hydraulic and cable), the brake pads gradually wear down and need replacing. For drum brakes, the internal mechanism eventually becomes less effective. Some electric scooters also have electronic braking systems; while these are less serviceable, physical components like the brake lever or wiring may still need attention.
Before starting any brake replacement, safety should always come first. Always turn off and unplug your electric scooter. If possible, remove the battery or disable the power source completely to prevent any accidental throttle activation. Make sure you’re working on a flat, stable surface, and consider using a scooter stand to elevate the wheels for better access. Wearing gloves and safety glasses is highly recommended, especially when dealing with small parts and tensioned cables.
Once safety is addressed, gather the necessary materials for your brake repair or upgrade. Depending on your brake system, you may need a hydraulic brake kit (which includes calipers, levers, hoses, and fluid), brake pads, a brake cable, and a brake handle or lever. For drum brakes, you’ll require a replacement drum unit and possibly new linkage. Having basic tools such as Allen wrenches, screwdrivers, pliers, a torque wrench, and if needed, hydraulic brake fluid, is essential. Keep a clean rag or towel on hand as well, since brake maintenance can get messy, particularly when dealing with fluid systems.
Let’s begin with changing hydraulic disc brakes, the most advanced type commonly found on performance e-scooters. Start by removing the wheel to access the caliper and rotor. Loosen the bolts holding the caliper and carefully remove the old brake pads. Inspect the rotor for wear or warping and replace it if needed. Next, install the new brake pads and reattach the caliper, ensuring it's centered over the rotor. If you’re replacing the hydraulic hose or lever, you'll need to bleed the brake system to remove air bubbles. This ensures consistent pressure. Use a brake bleed kit and follow the manufacturer’s instructions to fill the reservoir with hydraulic fluid, typically mineral oil or DOT fluid, depending on your brake type.
For cable disc brakes, the process is slightly simpler. Again, remove the wheel for better access, then unhook the brake cable from the caliper. Unscrew the caliper bolts and remove the old brake pads. Insert the new pads and reinstall the caliper, making sure it aligns with the rotor. You may also choose to replace the brake cable if it’s frayed or stretched. To do this, detach the cable from the lever and feed a new one through the housing. Make sure to adjust the tension properly, there should be slight resistance at the lever, but not too tight. Finally, spin the wheel and squeeze the brake lever to ensure the pads engage the rotor cleanly.
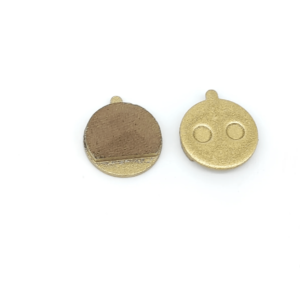
Drum brakes require a different approach. First, remove the wheel and locate the drum unit, which is typically housed in the wheel hub. Unscrew the casing and take note of the internal mechanism. There will be two brake shoes that expand to press against the drum’s interior surface. If these shoes are worn, they need to be replaced. Swap them out with new ones, ensuring all springs and return mechanisms are intact and properly seated. Reassemble the drum and wheel, and test the brake linkage by activating the lever. Drum brakes are known for their longevity and enclosed design, which makes them more resistant to dirt and moisture, but they can still benefit from occasional cleaning and inspection.
Once you’ve completed the installation or replacement, it’s important to run through a checklist of post-intervention tests. Begin by spinning the wheels freely to make sure there’s no rubbing or drag. Engage each brake individually to test response and stopping power. For hydraulic brakes, ensure the lever feels firm and doesn’t sink to the handlebar. For cable systems, test for slack and tighten as needed. For drum brakes, check that the lever returns smoothly and the brake engages without delay.
Do a slow test ride in a controlled environment, applying each brake gently at first and gradually increasing pressure to check performance. Listen for unusual noises and observe how the scooter responds. If anything feels off, such as weak braking, noise, or uneven resistance, recheck alignment, cable tension, and pad positioning.
As part of regular brake maintenance, make it a habit to inspect your brake system every 2-4 weeks, especially if you ride frequently. Look for signs of wear, check for cable stretch, and wipe down exposed parts to remove dirt and grime. Keeping your brake components clean and well-adjusted significantly extends their lifespan and ensures your safety.
Changing electric scooter brakes may seem intimidating at first, but with the right parts, a methodical approach, and basic tools, it becomes a straightforward task. Whether you're using hydraulic disc brakes, cable disc brakes, or drum brakes, understanding your system and knowing how to maintain and replace it empowers you to ride with confidence. By following this detailed scooter brake tutorial, you'll not only improve performance but also extend the life of your e-scooter.
If you're looking to purchase replacement parts like brake pads, hydraulic kits, brake cables, or levers, be sure to check that they are compatible with your scooter model. Investing in high-quality components ensures smoother operation and better safety over time. With consistent brake maintenance and timely replacements, your electric scooter will be ready to handle every ride with optimal control and stopping power. Do you know which electric scooters are road legal in Switzerland?
Come and visit us at our stores and we will help you and repair it for you!
📍Place Chauderon 26, 1003 Lausanne
📍Landstrasse 122, 5430 Wettingen
📍Kalkbreitestrasse 98, 8003 Zürich
Stop by or make an appointment <link to booking>